Right now on my studio worktable I have a stack of photo transfers in progress and another pile of photos printed to paper ready to transfer.

Why?
Actually, that’s a two-part question. Why do I have a lot? Why incorporate photos into art quilts at all?
The first part is easier. I am beginning a large work that will be created in four panels with much of the imagery created by photo transfers. So far I have planned out the composition, prepped my photos for reproduction, and had the laser copies printed. Now, one by one, I’ll transfer the photos onto muslin. There will be abut 50 transfers 12” x 18” size in this work.
Second, why use photos in art quilts at all?
For readers who are art-lovers but not necessarily art-makers, I think it deepens the appreciation of a work to explore why artists create in the way they do. Quilt artists use photos in a number of ways. Sometimes, the whole composition of the quilt is about reproducing the image from a photo. I am more interested in juxtaposing a photographic reality with a non-photo reality. It’s a way to add depth of meaning (as well as visual depth) to a narrative work.
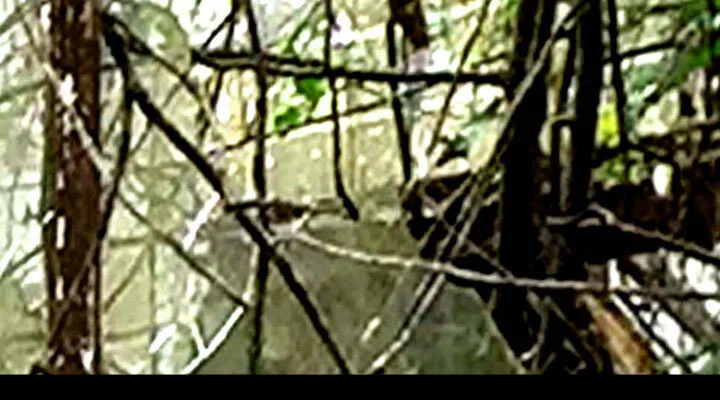
This is a work from 2018 I created using photo transfers: “Something Else will Grow There.”

The patterns of leaves-light-and vines within the house are transferred onto muslin from a photo I took of an abandoned house. I think it’s a wonderful image. (I’ll be using it again in the large 4-panel work I’m creating now.) But, rather than just make a whole work of this photo, I have incorporated the image into a child-like house in a setting that is story-like. Now, when encountering this work, this viewer’s brain starts to sort things out. “Look, that’s a photo. It must be a REAL thing. But, look, there’s a child-like image. It must be a NOT-REAL thing.” I believe the viewer is drawn deeper into the picture surface and the story through this process.
Here's a detail of another new work that’s in progress now

This work uses image elements in a more graphic and symbolic way. The spoons are photos of actual flatware with an intricate repousse pattern. (My grandmother’s silver pattern.) Layered in with the spoons is monotype-printed sheer fabric, monotype-printed muslin fabric, and semi-transoarent images of flying insects. There’s a lot going on. Sorting out what all of this might mean is an entry into the artwork.
For readers who are artmakers, you might be interested in my process of creating transfers. There are many, many ways to get a photo on fabric. But, in the hope that one more way might be helpful to your studio practice, at the end of this blog I’ve described my process. Happy creating!
For more information on “Something Else Will Grow There” and to see more storytelling works incorporating photo transfers, I invite you to visit these galleries on my website:
HOME IS WHAT YOU REMEMBER GALLERY.
JOURNEYS and STORIES GALLERY
Thank you for reading. I always enjoy questions and comments.
--Bobbi
bobbi@bobbibaughstudio.com
BLOG POSTS: If you would enjoy receiving blog posts by e-mail, please subscribe here: I post blogs once a week. BLOGS-BY-EMAIL
NEWSLETTER: If you enjoy more detailed behind-the-scenes stories, as well as FIRST LOOKS at new works and members-only discounts, I hope you’ll become a Studio Insider. You’ll hear from me about once a month. NEWSLETTER
How I transfer photos to fabric
Most people who transfer onto fabric use inkjet presses and print directly onto the fabric. There are various grounds and treatments you can put on the fabric to make it receive the image and all kinds of ink jet printers. I mention this upfront because there is a lot written about how to do this, and many people like the process and the results a lot.
I don’t use ink jet. I begin by purchasing color laser copies from my local print shop. All commercial shops who make color copies are using laser copies- not ink jet. (You can tell because the copy is warm when it comes out of the machine.) Be sure to create your images to print in mirror image so they will be right-reading when transferred.
I transfer onto plain old cotton muslin.
I generally rinse the piece in hot water to get the sizing out, then lay the wet fabric on a flat surface (covered with a plastic sheet) and press it out with my hands to get rid of bubbles and wrinkles.
Slather on gel medium (Matte. Thick) with a brush.
Turn your copy upside down onto the gel medium and press it – copy facing the medium – into the gel.
Rub with your hands, Brayer, Burnish it with a wooden spoon.
Go away and let it dry at least 24 hours.
Now gently rub off the paper. Use soft cloth or a toothbrush or your fingers. Use water. Just keep working it. It’s quite tedious. It takes time to get the paper scum to go away. If there are any places where the gel medium did not contact well with the toner you’ll get a gap of no image. It is a fussy process.
But, I enjoy this kind of transfer and I like the results.
The only way to know if this works for you is to do some practicing. Best wishes.